Botox Betty!

K guys...I'd like to start out this post by warning this is a JUDGEMENT FREE ZONE! Haha. If you are anti all facial injections/plastic surgery this is NOT a post for you :) 

Paige here getting real about getting old. I'll be the big 3-0 next year (the oldest Salty) and although I'm all for "accepting yourself for who you are" and "loving the skin your in", I'd really love it if my skin looked like it did back in 2010 :) SO I've made a few adjustments or, injections to try and make that happen.

My sisters, and mother as a matter of fact, were initially against me doing this post for fear of us all coming across as fake b!*$%es, so I'd like to make it known that I am the ONLY one of us dabbling in botox and fillers at this point :) We'll see how they feel in a few year though! Anyways, I've been doing some new things with skincare and using some new great products that I love and want to do a new skincare post soon, but first I felt like I had to give you guys full disclosure and let you know what else I'm doing! I also wish I had had a blogger to refer to when I was decided what to get done! So here you go. And if you have any questions feel free to ask away in the comments! 

I'll just come right out with it. I've had:

-Lip injections (twice) about six months apart

-Botox in the jaw (more on this later), on either side of my nose (this too), and a little in the forehead 

-Voluma in my cheekbones and smile lines 

Lip Injections

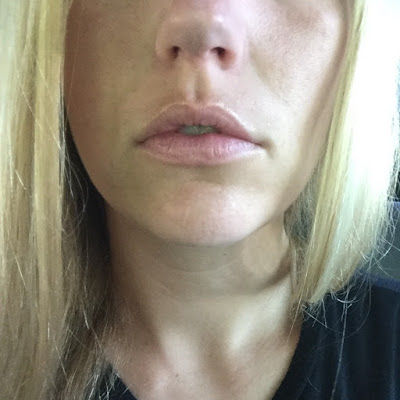
Yes, I gave into the Kardashian nation stereo type and plumped up my lips (a LITTLE)! Like I said...judgement free people! I've always had thin lips, but I felt like they'd gotten even thinner over the past 10 years and I wanted a little plumpedge. Sue me :) Haha anyways, the first time was about a year ago right after I had MJ. I had asked for it for Christmas (is that weird?) and went and got it done from a plastic surgeon downtown (Salt Lake). I won't say who it was because I didn't love them, and I'm not sure if it was the doctor who did them or just my body's reaction the first time but they were super swollen and lumpy for quite a while. 

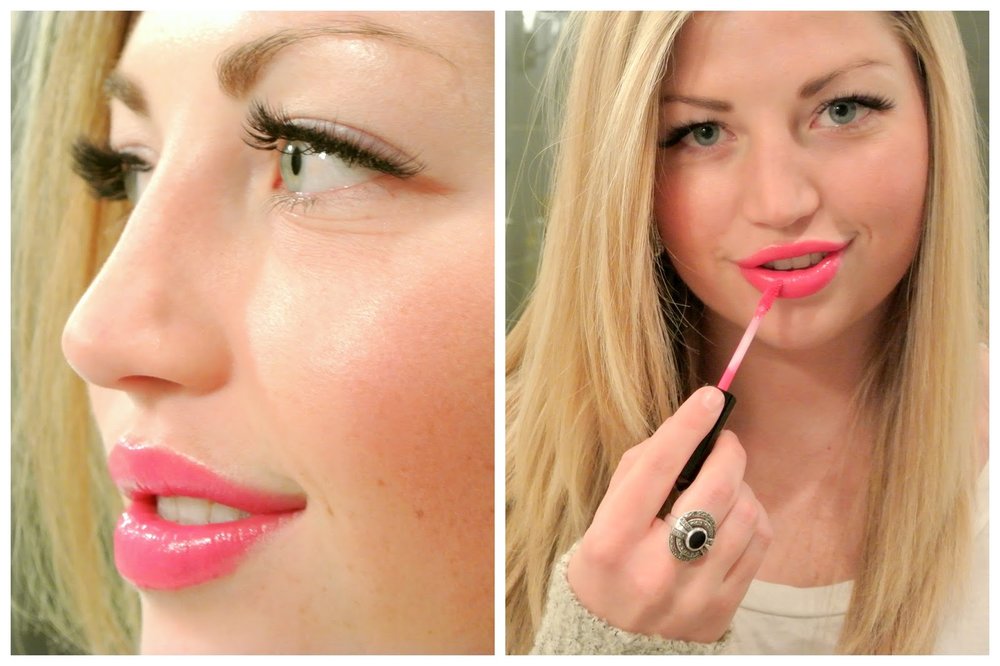
Here's a picture of what they looked like right after:

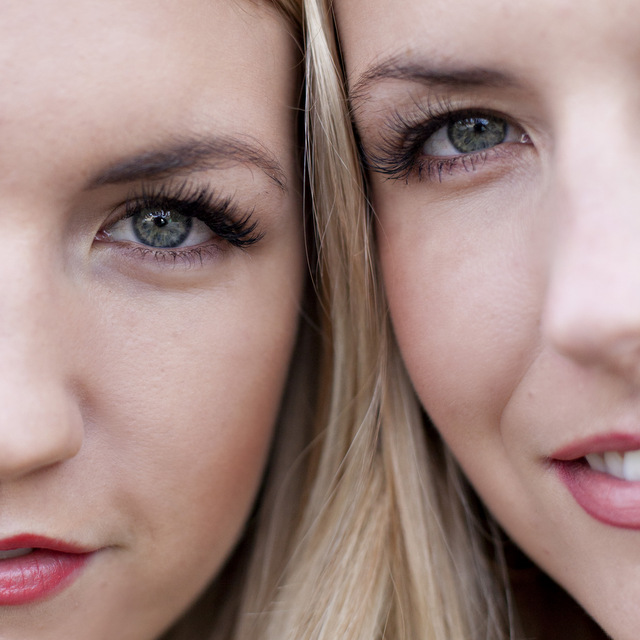
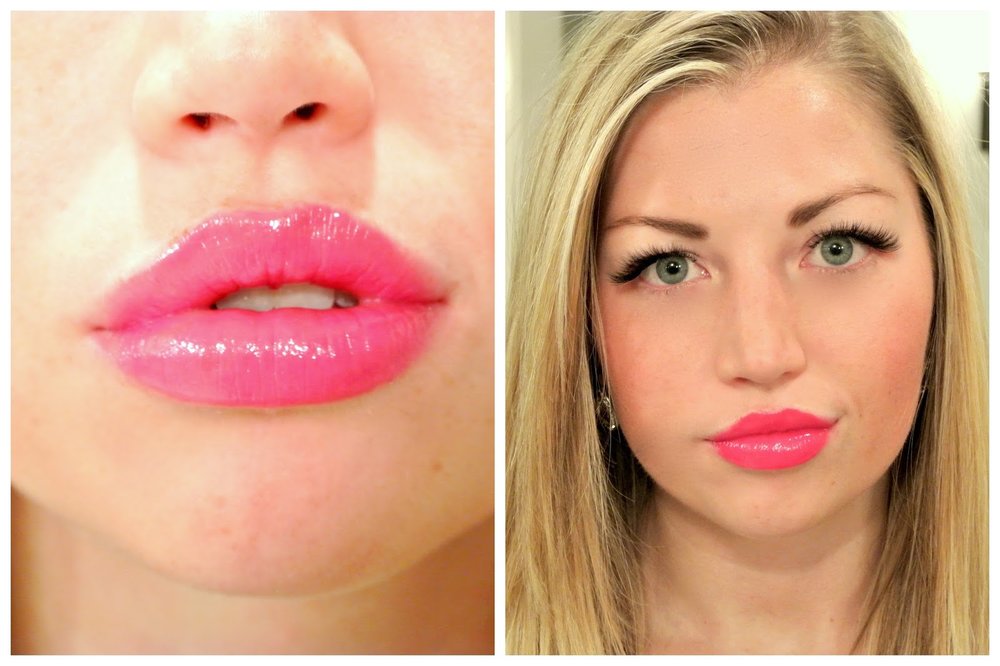
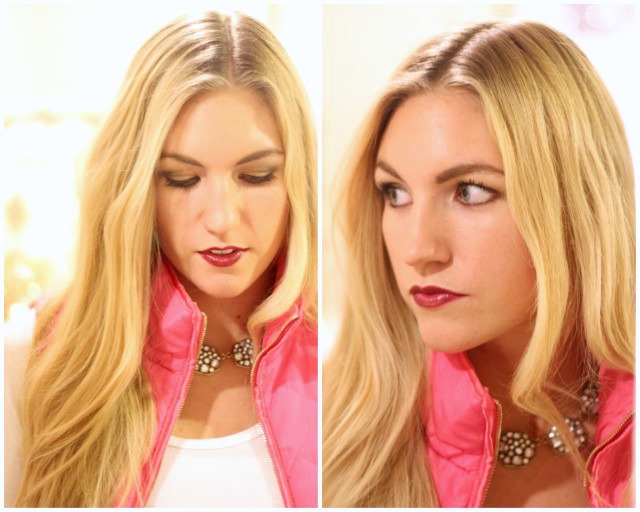
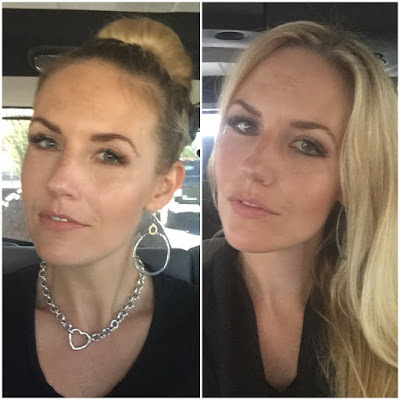
After a while they calmed down and I liked them. Here's a before and after picture:

The second time I got them done, I had a way better experience. I went to Regan at

Visage

(apparently now known as Beatuy Lab?) who specializes in the Mini Lip Plump. It's $350 and the perfect amount of plumage! My lips hardly swelled at all and looked great the next day. Search the hashtag #lipsbyregan on Instagram to view his work. He was the best! Below is what they look like now compared to before I had anything done. When I got them done the second time, it was about 6 months after the first time, and I still had some left in there. It's been about 5 months since the second time and they still look great!

Botox

Ok I don't really have before and after pictures of the botox because it was mostly preventative or in areas you can't really tell from pictures. Also, I wasn't planning on doing this post! Sorry. The main reason I did botox was because 

Amara Day Spa

 had a deal going on where you got 20 free units of botox with one purchase of a filler. For the injection virgins; botox basically freezes the muscles where it's injected preventing wrinkles, while fillers actually fill out already existing wrinkles and add volume to the face. Anyways, I got this deal because I really wanted to get Voluma (a filler that I'll talk about next).

As I mentioned at the beginning of this post, I got botox in my jaw, on either side of my nose, and in my forehead. I got it in my jaw because I grind my teeth at night, and it helps soften the muscles so I can't do it as bad (nothing too exciting there). I got it on either side of my nose to help lower my smile (great if you have a gummy smile). I wish I had a good laughing photo of me to show you so you could see what it looked like before, but I don't. You'll just have to imagine a horse...jk haha. It wasn't THAT bad. Lastly, I got the remaining botox in my forehead to soften those lines!

Voluma

K guys, now on to the big guns ;) Probably my BIGGEST complaint about my aging skin was my smile lines. I've always had them due to genetics, but over the past few years they'd really started to bother me because they'd gotten deeper even when I wasn't smiling. I was really afraid of getting them filled in however because I'd seen/heard so many horror stories! Then a friend of mine told me about Voluma, which is a fairly new filler used to enhance the cheekbones which helps lessen smile lines. It also lasts for 2 years! Basically a perma contour without makeup, and softer smile lines for 2 years...yes, please!

Needless to say, as soon as I heard about this magic, I needed it. It's expensive ($900) so I started saving and scheming right away :) I ended up convincing my husband to let me do it by saving for part of it, and him "giving it to me" as my combined birthday and Mother's Day present. So anyways, that's how I got Voluma! Woohoo! And I love it. It's subtle yet amazing.

I went to Melissa at Amara to get my Voluma because a friend recommended her, and she was great! It's so important to go to someone you trust for Voluma because they are basically shaping your face and need to know what they're doing! I highly recommend Melissa but don't think she works at Amara anymore. I tagged her in my Instagram post if you'd like to reach out to her!

Below is a before and after of Voluma:

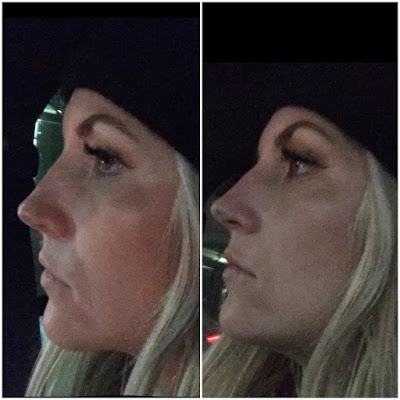
Disclamer: I feel like the above before and after shows very dramatic results, and although I love it, I don't think it made AS big of a difference as the picture makes it seem. I think the two pictures must just be from slightly different angles and the lighting is worse in the first. I can tell a big difference though and love the results!

Well there you have it. Everything I've done to my face thus far to try to cling to my 20s :) If you have any questions or are thinking about getting any of these things done yourself, feel free to comment below or email me at saltyblondes@gmail.com!

Skincare Essentials Part 2: Nightly Routine

Step One: Remove face and eye makeup.

We like Neutrogena's HYDRATING makeup remover towelettes. It's common knowledge how important it is to NEVER go to bed without washing your face. Not going to lie though, we've all had those nights when you're just so exhausted, the last thing you want to do is get up and wash your face before crashing. If you're going to skip it, at least wipe your makeup of with one of these cleansing towelettes!

Step Two: Exfoliate with cleansing brush and Purity cleanser.

Our favorite cleanser is Purity cleansing gel by Philosophy. This stuff is amazing, and not to mention smells delicious :) We've all heard of the clarisonic, but there are so many cleansing brushes out there, and we've actually found one we like even better! It's the Spin for Perfect Skin Brush from Vanity Planet. It comes with four brushes: a cleansing brush, exfoliating brush, body brush and pumice stone. PLUS, we have a discount code for out readers for 70% off all face brushes! Use code saltyspin at checkout :)

Step Three: USE A RETINOL!

Ok, Paige here, and this is something I swear by! I'm 27, and a few years ago I started noticing some deeper wrinkles starting to form on my forehead and around my mouth. In today's world, of course we all want that quick fix, so my first instinct was to get me some botox! Pronto! After talking to my mom and a dermatologist, they recommended trying a retinol first. I tried out a bunch and finally found one I'm so in love with! It made a HUGE difference, and I'm so glad I didn't go straight to botox! I use GLOW by Dr. Brandt. It's a little pricey, but lasts SO long and is SO worth it!! I can't stress this enough people! :)


Step Four: Moisturize.

For our eyes, all three of us, as well as our mom, use All About Eyes by Clinique. It's the best! As far as moisturizer goes, our mom, Regan and Sidney all use Olay's Regenerist Micro-Sculpting Cream. It's a drug store product you can get for $20 at any grocery store or by clicking on the linked picture below. There have been so many studies done showing Olay products to work just as well as most expensive department store creams, and we love this one! Paige however, has become somewhat of a moisturizer snob, and has been switching out between this and another one of her beloved Dr. Brandt products. It's pricey, and she's embarrassed to even admit paying this much on a moisturizer, but swears by it. We suggest getting a few samples of it first at your local Sephora, and decide for yourself what works best for you :) As for the rest of us, we think we'll be sticking with our $20 Olay cream! Both are pictured and linked below, as well as our eye cream :)


Although this is all pretty self explanatory, sometimes we need things laid out plain and simple…so we've included another short video tutorial. Watch me, Paige, below doing my nightly skincare routine. Also, don't ask why my mouth is open the whole time like a weirdo while using my facial cleansing brush! K bye :)

Skincare Essentials Part 1 - Foundation Tutorial

We've been meaning to share our skincare routine for a while, and now that we're entering one of the hottest months of summer (when skincare is most important) we thought it would be the perfect time. 

Using clean, natural makeup without any harsh chemicals is really important to us. Using a foundation that actually IMPROVES your skin…well that's just a dream come true ;) Working at Nordstrom, Paige tested out a ton of different foundations thanks to her friends at the makeup counter. She eventually found one that she fell in love with, and we all three now use and love it too. We use Clinique's "Even Better" Makeup as our main foundation. Not only is it free of harsh chemicals, but it actually helps IMPROVE your skin. The shade we use is "honey" but stop by any Nordstrom or makeup counter to find your perfect shade :) Click on the picture below to read more about it.


After applying Clinique's "Even Better" Foundation with a brush, we blend it with a beauty blender. If you guys don't have one yet, we highly recommend it! Click on the image for the link.


For extra protection, and to set the foundation, we use colorescience sunforgettable powder. This stuff is seriously amazing, and offers great protection from the sun all day long. Click on the picture below to read more about it.

Lastly, we use a little bronzer under cheekbones to make them stand out, and sometimes a little blush (we're not big blush people, but we love "warm soul" from MAC). The bronzer and blush we use are pictured and linked below. The bronzer color is "medium deep".


Below is a short video tutorial on applying foundation, made by the one and only

Sidney Shannelle Studios. Follow her on Facebook and Instagram and watch for an upcoming giveaway! 

Lashes

We are so in love with our new eyelashes from Lash Affair Utah! We've been wanting eyelash extensions for a while now, but were worried they might look too unnatural or be annoying our eyes. We were so wrong and couldn't be more pleased with how they turned out!

Paige's sister-in-law, Noelle, has been getting her lashes done from Lindsey for a long time, so when Lindsey recently started her own business, we knew we had to give them a try. Check out Noelle's perfect lashes HERE

There's a couple different options for eyelash extensions, so we thought we'd fill you in a little since we were totally clueless when they asked us what kind we wanted. Lindsey did the volume lashes on Paige (right), which are finer, lighter lashes with 3 grouped together for every 1 natural eyelash. This creates a really full, but natural look. Lauren did the classic lashes for Regan (left), which are thicker individual lashes and are glued on just one at a time. These are a little bit bolder looking. 

We highly recommend Lash Affair Utah if you're thinking about getting eyelash extensions! Mention Salty Blondes when making your appointment to receive $25 off your first time. We love that we can just wake up with ZERO makeup on and still feel like we look decent.  Plus, they're 100% waterproof...perfect for summer days at the beach or pool ;)

Having lashes for summer is actually what we're both the most excited about. We can't wait to show up to the beach makeup free with gorgeous lashes! We've already started a little summertime shopping, and below are our favorite new swim suit coverup dresses from Jane.com!

No Hair Don't Care

Photo by Courtney's sister-in-law Tiffany Morton

We couldn't believe it when we recently discovered our cousin, Courtney, has breast cancer.

Our family was so shocked when we found out because she is one of the healthiest people we know, and is so young!

She has an amazing story and we wanted to share a little bit about her, because she is one of our favorite people and we are so inspired by her.

Courtney has always been someone we've admired and looked up to. She is just the type of person who radiates happiness, and is genuinely kind to everyone around her. She has been through so much, and is still smiling through it all!

Courtney wrote up a little backstory for us, and we wanted to share her story in her own words. She is the mother of three boys, and Mitch is her oldest.

Mitch was born extremely premature at 25 weeks weighing 1 pound 3 ounces.  He was 12 inches long… about the size of a dollar bill.  We knew there was some bleeding on the brain before he was born but we didn’t know the severity of it. After he was born, we found out that he had a grade IV brain bleed, we knew there would be complications from that but didn’t know what or how severe.  He spent nine months in the NICU.  He is the real fighter here! My sweet baby fought for every breath.  He finally had to have a tracheotomy done to get off the ventilator to come home.  He also had a feeding tube placed because he wasn’t able to eat enough to sustain him. He has been a driving force in all of our lives ever since.  Mitch is now 13 years old and has Cerebral Palsy. He doesn’t speak but he communicates very well with the people closest to him. He’s personality plus even without talking! He still has his feeding tube but likes to taste things. He’s not walking but he gets around by scooting everywhere. In some ways he is your typical teenager.. messy room, moody, likes his space and freedom but in other ways he is still my sweet baby. He brings so much joy to our lives. He has two little brothers that love him very much. He’s had the best influence on them and we are so grateful for that. Every decision we make requires a careful consideration for how it will affect Mitch and his brothers, right down to the decision I made a long time ago to be the healthiest I can be to care for him. My fitness journey started with changing my eating habits, for most people its the opposite.  I cleansed my body first through juicing and other things and then I started feeling so amazing and I had all this energy and I wanted to start working out as well. My moms diagnosis of diabetes was a defining moment in my journey as well.  I really started thinking about the effects of my health on my family and most importantly Mitch.  I realized as Mitch got older and heavier that I had to make a change.  I started looking for personal trainers and different things and I came across my now good friend, Lindsey Mathews, owner of Moxie Full Body, and tried one of her boot camps and fell in love with the whole program. This was the perfect solution for me! Her program focused on diet as well as lifting weights. She is the one that got me so excited about lifting heavy.. I was one of those girls that believed I would look too β€œbulky” if I lifted heavy! Haha! I was wrong.. she helped me get to where I am now and pushed me to my outer limits and I’ve been amazed at how my body has changed. I had the good eating habits before but now I have strength too! I love it! Most importantly I have loved feeling strong enough to lift Mitch when I need to and care for him

I realize now that everything I have been through in my life has prepared me for my battle with cancer. October 9, 2014 I got the call that no one wants to ever get in their lifetime. I was diagnosed with Invasive Ductal Carcinoma, aka breast cancer. My life has been a whirlwind ever since. One thing that remains constant… my eating habits and working out. I have breezed through chemo because I am so healthy. I have continued lifting heavy through my treatments and that gives me the fuel I need to fight this. I am incredibly blessed to have this cancer at the most healthy time in my life.

How awesome is she?! Courtney's son, Mitch, is the sweetest boy, and she is the best mama. We love this sweet family!

Courtney_027.jpg

Photo by Courtney's sister-in-law Tiffany Morton

She has been so inspiring to us throughout this whole ordeal, and we just had to do a post with her and share this amazing, inspiring woman with you as well! We know there is a ton of stuff out there on breast cancer awareness, but this just hit home with us, and we thought it wouldn't hurt to put it out there on our blog too.

Seeing how beautiful she is with or without hair is just a real testament that true beauty comes from within. Even with everything she's going through, she is just glowing and so gorgeous! Plus could she look any more awesome rockin this sweatshirt everywhere she goes? We love it!

She also has an amazing sense of style (when Paige worked as a  personal stylist at Nordstrom Courtney was one of her top customers ;) - are you as obsessed with these lululemon leggings as we are?! 

Our shirts, and Courtney's sweatshirt + tank top we got from a friend's company, who donates money and clothes to cancer patients for every purchase made from their site. Check out their story here.

To support the cause and make a purchase from this awesome company, click on the links below.

We love you Courtney! Thank you for letting us share your story!

Tee | Sweatshirt | Tank Top

Courtney's bracelets made by Syndee Hargis

Thank you Connie Balluf for these amazing pictures!

Hair Essentials

We've recently received lots of requests for hair tips and tutorials.

To be honest, when it comes to styling our hair, we are pretty boring and like to keep it simple.

Basically, we have three go-to hair styles: straight, curled, and side braid ;) 

We do have a few essentials that we think are necessary steps in our daily hair routine, no matter the style.

First off, we can't tell you enough how important using good, quality products on your hair is. It all starts in the shower. We grew up using Paul Mitchell shampoo and Purology conditioner. Then we moved out and went to college, and started buying cheaper shampoo and conditioner, since we were the ones paying the bills. We noticed a HUGE difference in our hair and realized right away what it was. Quality shampoo and conditioner is worth the money people...trust us!

A few other things that are always part of our daily routines are...

Biotin

We learned about biotin from Pinterest a few years ago, and have been using it ever since. We feel it really has made a big difference in helping our hair to grow healthier and stronger.

Moroccan Oil

This stuff is seriously the best. Use it on wet or dry hair for soft, smooth, and shiny hair. You would think since it's an oil it would just make your hair look greasy, but nope! Even the day or two after a wash, a little bit of this stuff will have your hair looking fresh again and smelling AMAZING! 

The Wet Brush

If you don't own a wet brush...go get one now! IT WILL CHANGE YOUR LIFE ;) It's the ultimate brush for detangling your hair, especially when it's wet. It was a LIFE saver on our family Lake Powell trip after our hair would end up in a rat's nest on boat rides.  

Scroll down for a video tutorial on how to get the loose waves and twisted braid pictured below… 

We know we're both a little awkward in front of the camera, so bear with us! ;)

Holiday Lips

There's something about the holidays that makes us want to go bright and bold with our lip color. Maybe it's all the glittering lights and festive decorations, but if there is ever a time to break out the bright lipstick, it's the Christmas holidays. Bold lipstick dresses up any outfit and even makes you feel more confident and cheerful! Almost everyone looks great with bright lips, the trick is to find the perfect shade.

For this post we just had to feature Paige's cute sister-in-law, Noelle. She has the kind of gorgeous, full lips that people pay money for and we can't help but be a little jealous! All her lips need is lip balm and gloss...but for those of us who weren't blessed with natural, full lips, we need to add liner to make ours stand out. We like to add the liner around the very outside of our lips, then use the side of the liner to fill them in a little and blend it. Then we add our lipstick or gloss to the inner part of our lips. 

Below are our top three favorite shades for the holidays and coordinating lip pencils, as well as a short video tutorial to show you the best way to apply :) 

Noelle: Balm: Eos // Gloss:  NYX 'Dolly Pink'

Regan: Liner: MAC 'Vino' // Lipstick: MAC 'Rebel'

Paige: Liner: Smashbox 'Ruby' // Lipstick: Smashbox 'Firecracker'

Make-up Tips & Tricks: Part 1

Today we want to share a few make-up tips and tricks that our good friend, Ashley Armstrong, recently showed us. Ashley is a hair stylist and makeup artist at Amara Day Spa, Salon and Boutique.

The first is using this Smashbox foundation primer. 

She introduced Paige to this primer just before her wedding. She loved it and has used it ever since. Now we both use these products daily and love them! Regan uses the hydrating formula on the right because she has dryer skin, and Paige uses the color correcting blend on the left. This stuff is seriously awesome. When using this primer, your foundation goes on perfectly and stays all day! Just using this alone makes your skin look better, even before foundation. Try it, you won't be sorry! You can buy both HERE and HERE :) 

Next, we want to talk about brows. Good eyebrows can make a dramatic difference. We're probably a little behind on learning how to do our eyebrows, but we just recently started filling them in.  Like most of the world right now, we're obsessed with Cara Delevingne and her bold brows, which really made us want to up our own brow game!

Below is a little video that shows Ashley doing Regan's brows. It was hard to believe what a difference her bolder eyebrows made! Thank you Ashley for showing us the light!

BEFORE                 //                      BOTH                //                     AFTER

The two products being used in this video are Brow Tech To Go in Taupe, and MAC Eyebrow Liner in Fling. One important thing she taught us, is that your eyebrow should start in line with the corner of your nose, and end at a diagonal from there as well.  Start by making a dot with your liner where your brow should start and end, then begin filling in the bottom part of your brow, and lastly, the top. Use a brush to blend it in a little, and voila! It definitely takes a little bit of practice. If you don't feel comfortable using a liner right away, start by filling in your brows with eyeshadow!

All products can be found at Amara :) 

Ps. Amara also has the AMAZING Holiday Smashbox collection right now. Check it outttt.

Big thanks to Ashley for all your help :)